Overview
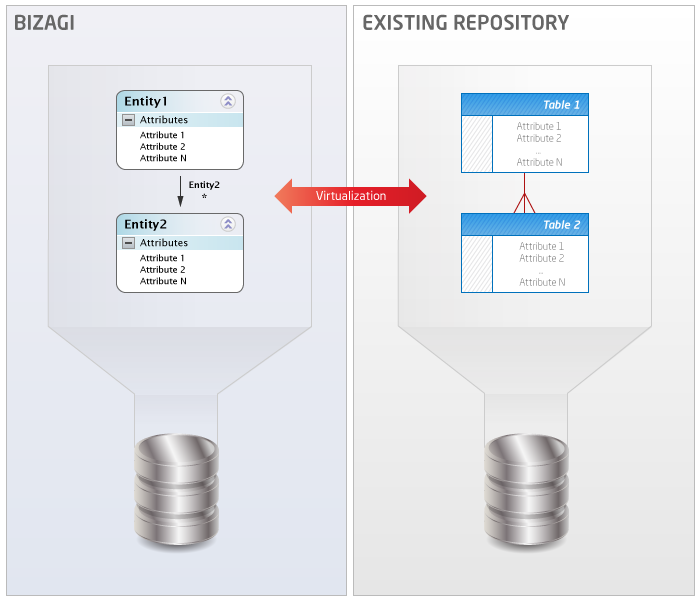
A Process will often need to access information residing in an existing repository, with the objective to present this information and manage it as part of the business process in Bizagi.
For this integration scenario, Bizagi presents a feature called Virtualization, which is a data-level integration mechanism to synchronize the information between the Process data model in Bizagi and the existing repository.
View more information about Virtualization.
The data access to the external source is performed on-demand while in the Process' execution, either to read or write data.
Through virtualization, more than one external table from the existing repository can be mapped to the Process data model in Bizagi, so that the external data source information is included in a transparent way.
When working with more than one external table (virtualizing multiple tables), it is common to find that these external tables have a relationship between them (typically, a foreign key). In order to include this relationship, an additional step must be carried out in the virtualization wizard to map the attributes between the related entities.
The following section illustrates how to configure the related entities' virtualization settings and mappings so that Bizagi uses the foreign key relationship to automatically obtain the information from the existing relationship (a SQL "JOIN").
Example
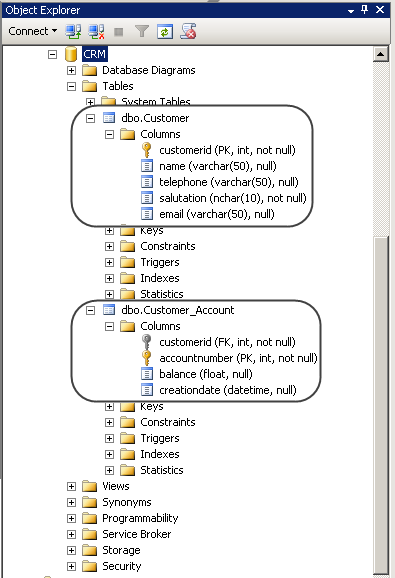
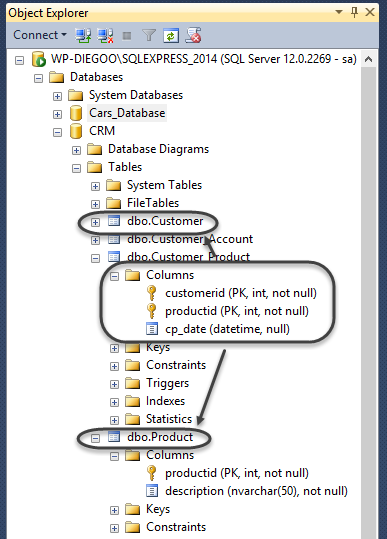
In this example we will present a Process in Bizagi which virtualizes two entities from an existing CRM repository (a sample database in SQL Server). The virtualized entities correspond to the tables: Customer and Customer_Account (with a 1-n relationship).
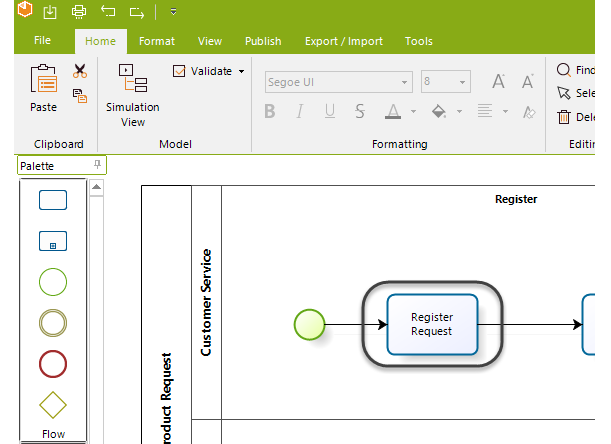
Our Process in Bizagi is called Product Request, and it will allow an end user to search for an existing customer or to register a new one (by using a Search control). This is done in the Process' first Activity called Register Request.
When the end user searches and selects an existing customer, the customer's existing accounts (and their information) will be automatically presented in Bizagi. To achieve this, we will describe the procedure which involves: configuring the virtualization for the entities, including their relationships, specifying the relationship mapping, and defining the form for the Register Request Activity.
Procedure
This procedure is done by:
1. Configuring the virtualization for the existing repository.
2. Including relationships for the virtual entities' use in the Process.
3. Specifying the mapping for the relationship.
4. Defining the form to show information for the multiple records.
Configuration shown in this section involves both steps from the Virtualization Wizard and the Advanced Virtualization options.
Configuring the virtualization for the existing repository
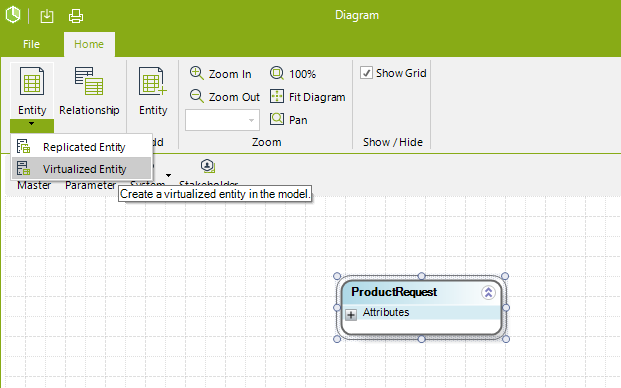
First, we will use Bizagi's virtualization wizard to create the virtual entities in our Bizagi project from the ones existing in our CRM database.
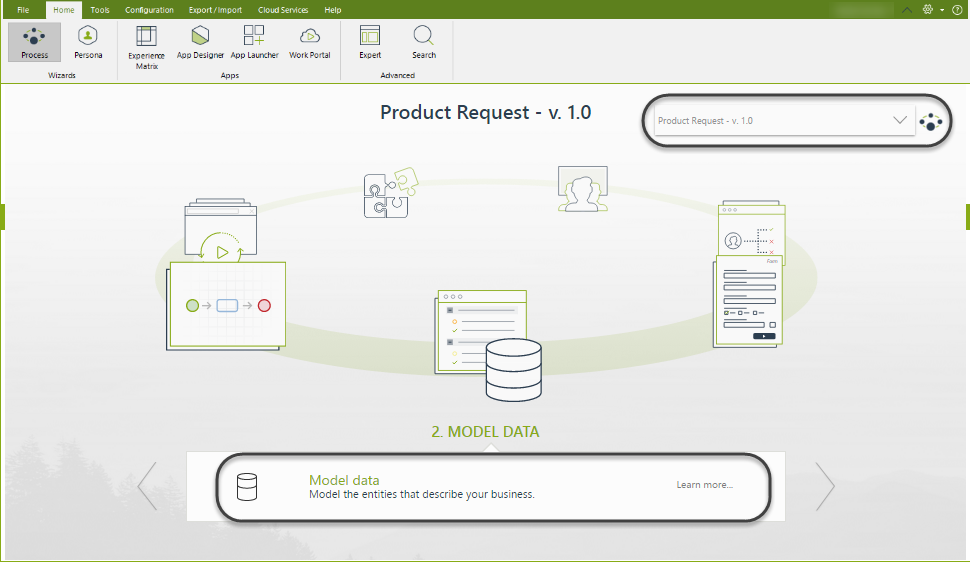
To do so, go to the Process wizard step 2 (Data model):
Launch the virtualization wizard to configure all the information necessary, related to our CRM database:
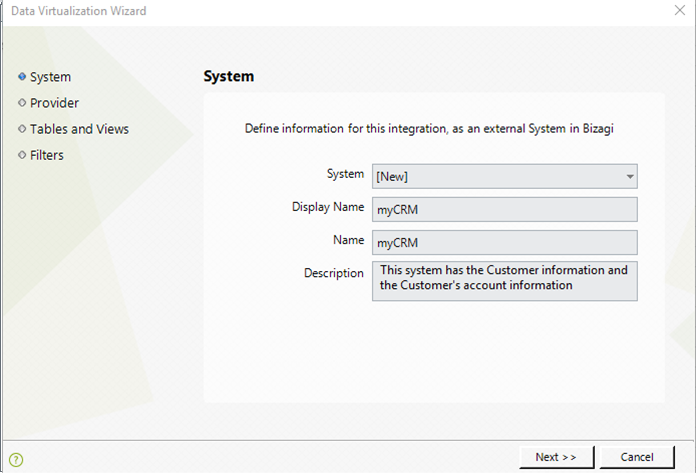
Include information to define and name your CRM as an external system in your Bizagi project:
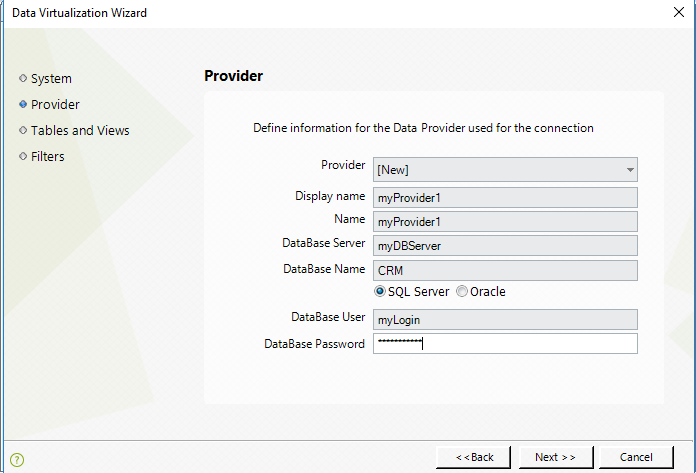
Specify the connection details for the connection provider:
Bizagi will present the available tables and views for Virtualization.
Select (check) the entities you wish to virtualize and click Next:
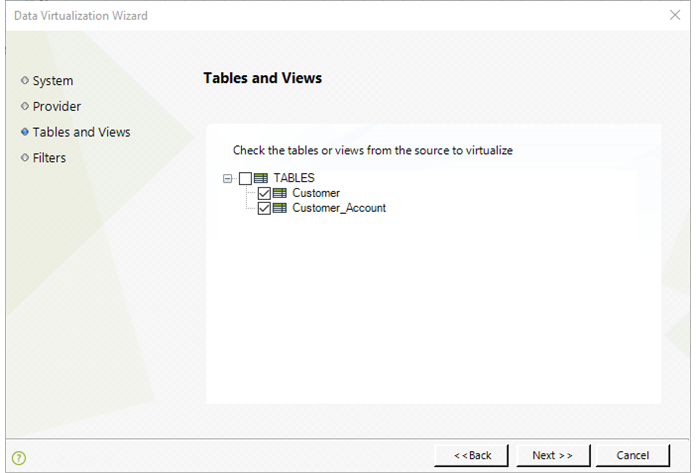
In the next step, we do not define a filter, as it is not needed in our example. Click Next.
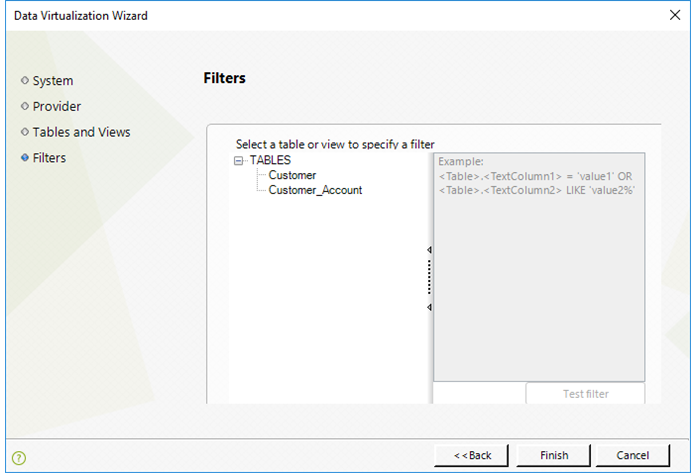
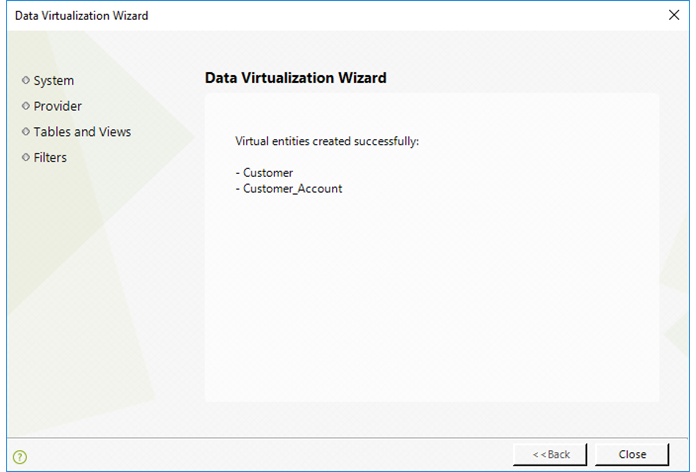
Bizagi will create the entities that correspond to the virtualized external tables:

|
Whenever the Virtualization and Replication wizard creates entities and maps them, it will create related attributes automatically provided that the included entities at this step have a relationship. The wizard creates this attribute as a simple reference, meaning that you will need to consider if it should be configured to be a 1-n relationship (or leave it as default as a 1-1 relationship). |
When finished, click Finish.
Including relationships for the virtual entities' use in the Process
Now we will proceed to include relationship attributes in our Bizagi data model to represent and handle the relationship between these tables in the CRM database.
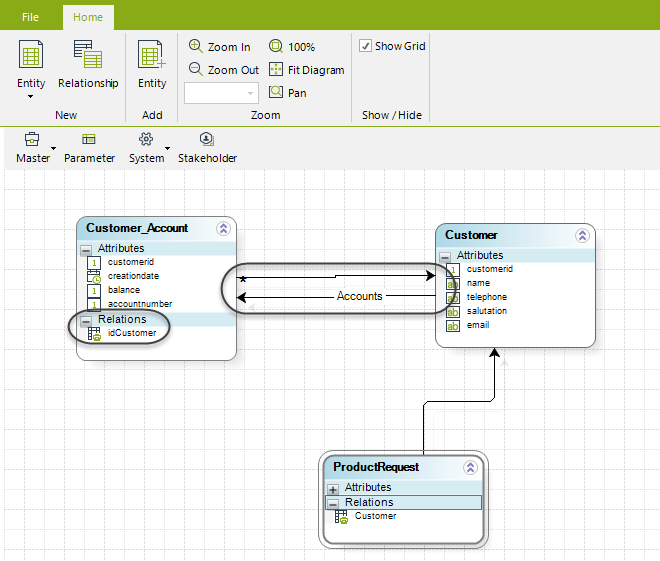
From our previous step, our Product Request data model will now show the two recently created virtual entities: Customer and Customer_Account.
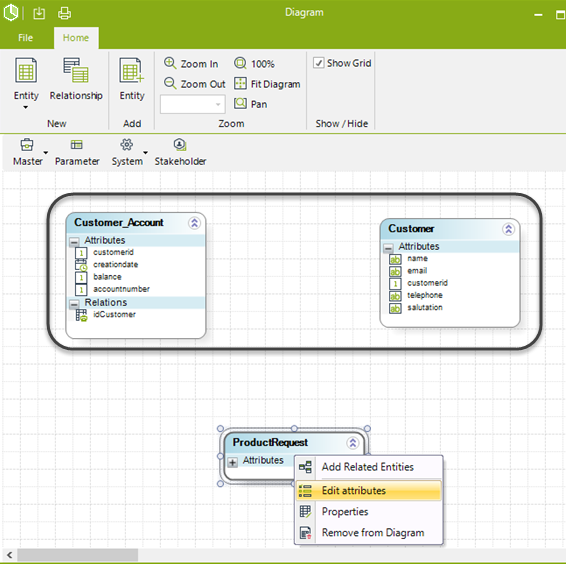
When using virtualization, there should not be attributes in a virtual entity without mapping to the external source (this does not apply for collection-type attributes). In the following data model example of a Bizagi Process, the additional attribute Request Date for a customer are created in another entity (in this case the Process entity called Product Request as well) which also has an entity reference attribute to the virtual entity Customer. This way, we are setting that in our Product Request Process (Register Request Activity), we will be able to create a Customer or select an existing one.
To allow this, make sure you have included an entity reference type attribute in the Process entity (Product Request):
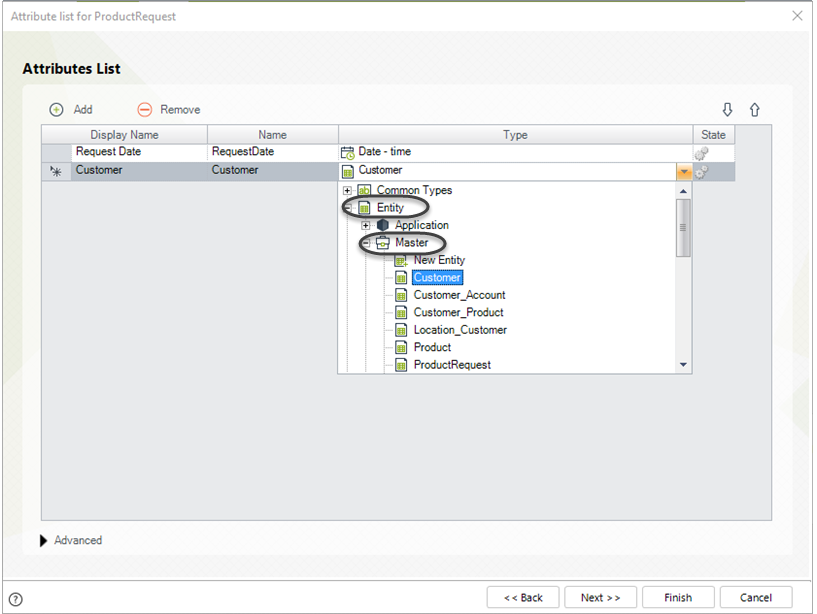
This way, we are setting that in our Product Request, we will be able to create a Customer or select an existing one.
Edit the Customer virtual entity so that we can specifically include a relationship between our Customer and Customer_Account entity.
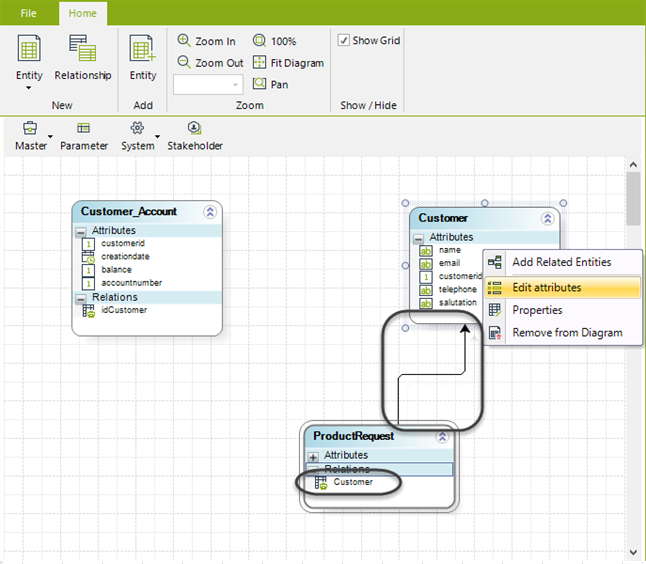
Edit the Customer virtual entity so that we can specifically include a relationship between our Customer and Customer_Account entity.
Consider that one Customer has one or more accounts (records in Customer_Account).
For this definition, we include an attribute of type Collection.
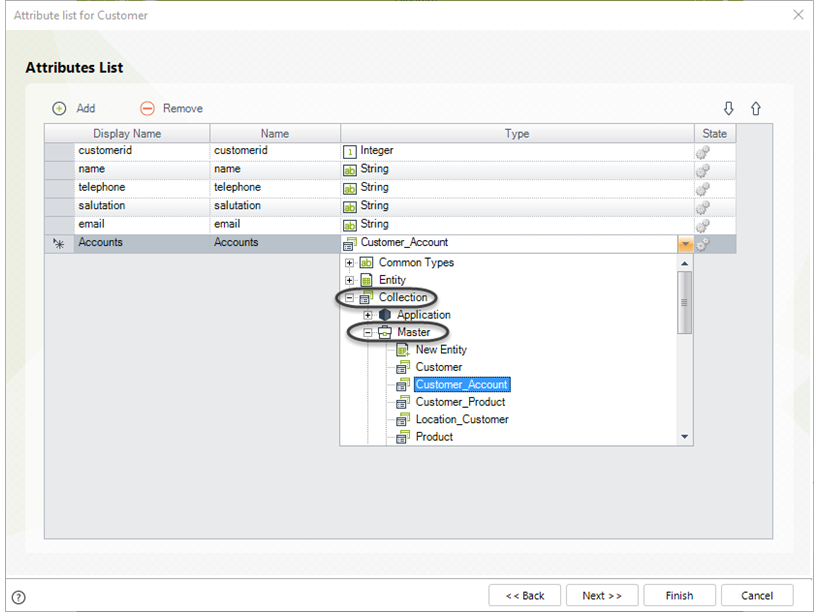
Recall that a virtual entity do not need to map collection-type attributes to the external source.
We will see that Bizagi now includes attributes to represent these entities relationship:
|
In the example above, Customer is the attribute which has a Related entity in Bizagi (created automatically due to the 1-n relation), for the relationship with Customer_Account. |
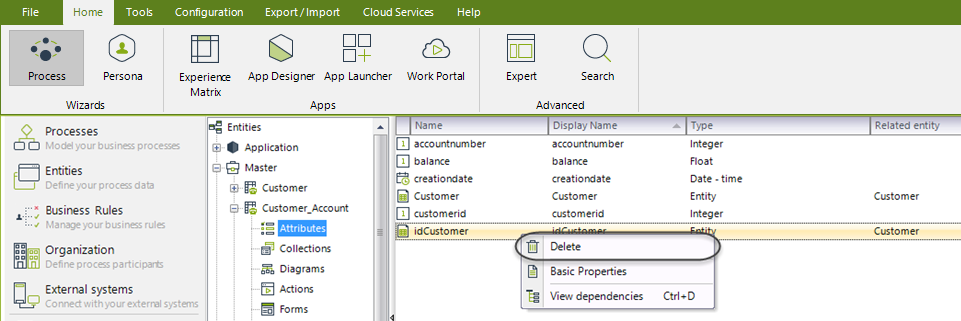
It is recommended that you delete the idCustomer attribute, since it is not part of the relationship in Bizagi's data model.
To do so, you may do this from the data model diagram, or directly at the Entities module and right-click to delete this attribute:
Specifying the mapping for the relationship
Once our Process data model in Bizagi is completed, we will include an additional mapping detail for the relationship we created in our previous step.
To do this, go to the Expert View and select the Systems module.
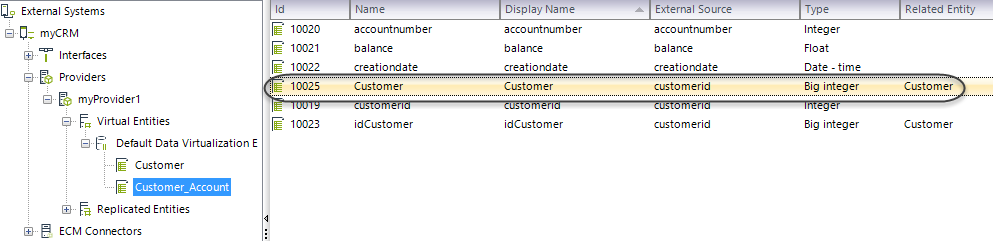
Navigate through the System and Provider as defined in the virtualization configuration ("MyCRM" and "MyProvider1"); and scroll down until you see the listed virtual entities: Customer and .Customer_Account.
Right-click Customer_Account and select the Add attribute to virtual option:

Include the "Customer" attribute created from the relationship in the Customer_Account entity, and map it to the CRM's database corresponding source (that is, type in the name of the column for this information).

Notice that this is a key part in the configuration, mainly since what it is important is that we explicitally set that Bizagi's relationship attribute in the Customer_Account entity (the entity having the foreign key in the 1-n relation) is mapped to the Customer key.
|
Note that the Customer attribute holds the reference to the related entity for Bizagi's purposes, while the customerid column has the matching reference for the external source's foreign key id. This means that whether if the Virtualization was configured using the wizard or not (done manually in the systems module), the mapping in the end should consider: one attribute in Bizagi's virtual entity which represents the relationship with another entity in Bizagi and has the mapped information to the source's column. |
We have now included the additional mapping for the relationship in Bizagi, to set which column determines the relationship in the CRM database.
Defining the form to show information for the multiple records
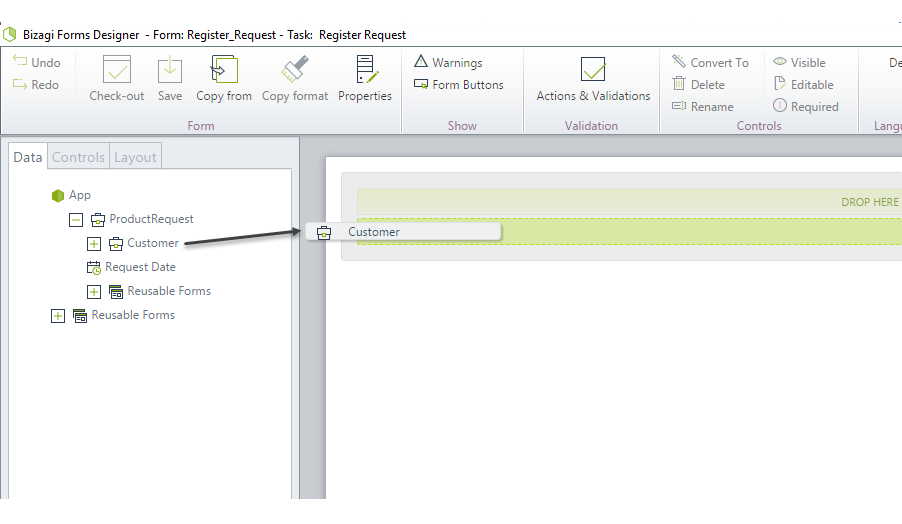
Finally we will include in our Register Request Activity's form, the fields of our entities to: allow selection of a customer and automatically show the associated accounts for that customer (showing the multiple records information for the relationship).
To do this, go to the Process Wizard view and select the third step (Define forms):
Include the Customer attribute of your Process entity into the Register Request's form.
By default, this will be displayed as a Search control.
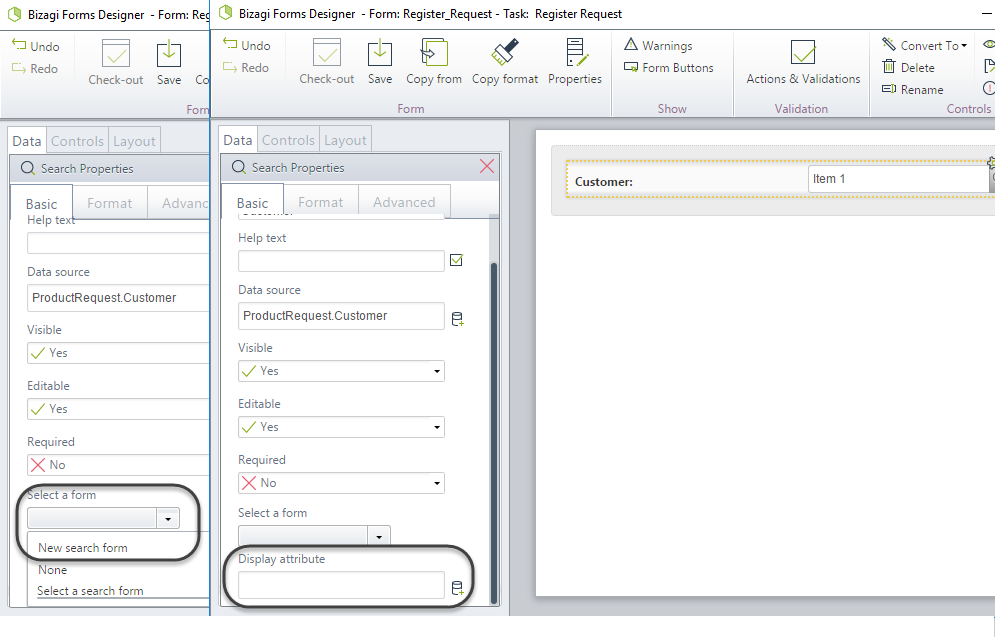
For this control, set its Search properties such as: The display attribute, and the form which opens (define a new one by selecting New Search form):
For the new form of the Search control, make sure you drag and drop a few of the Customer attributes (as searching criteria), and also make sure you give a name to this form.
Notice in this example, we included the Customer attributes Name and Email, and we named our form as MyCustomerSearchForm.
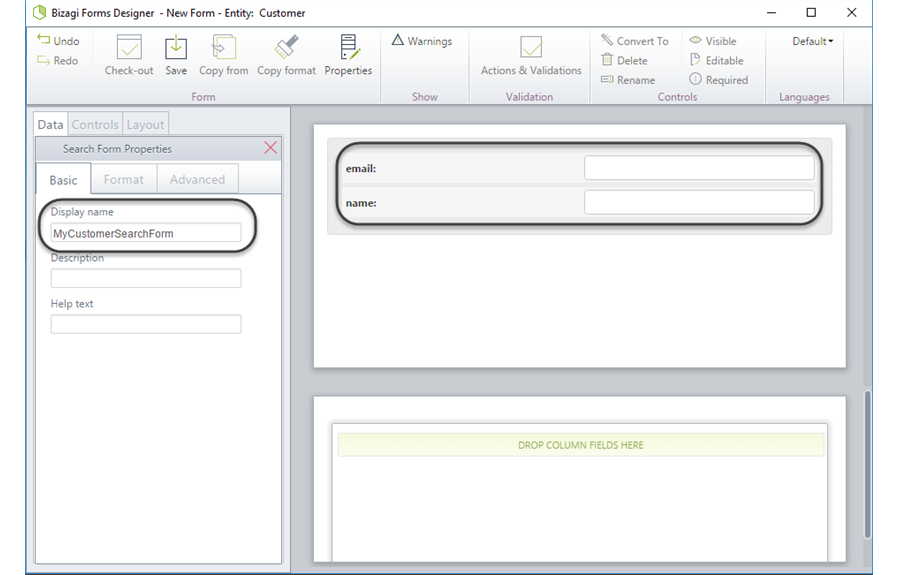
Save this new form.
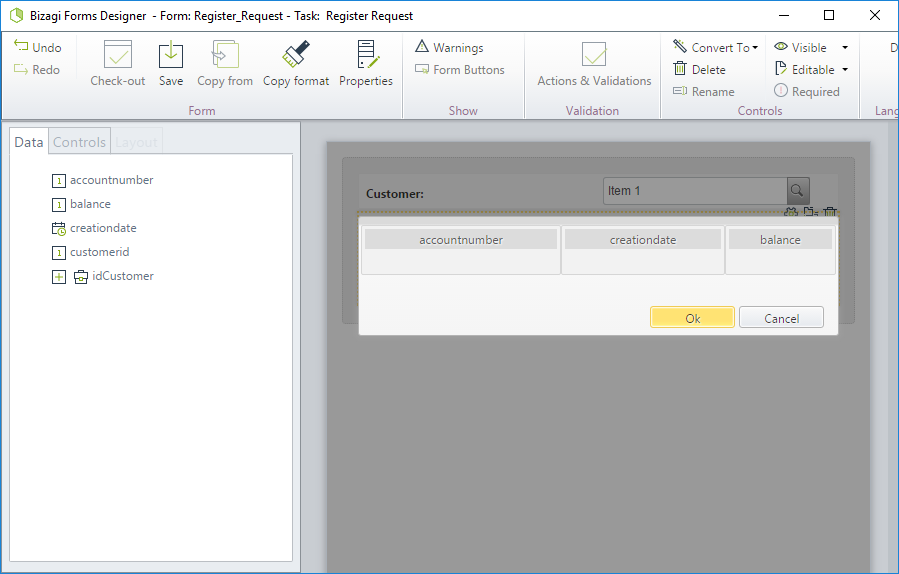
Include the Accounts collection into your form and edit the displayed columns for its table:
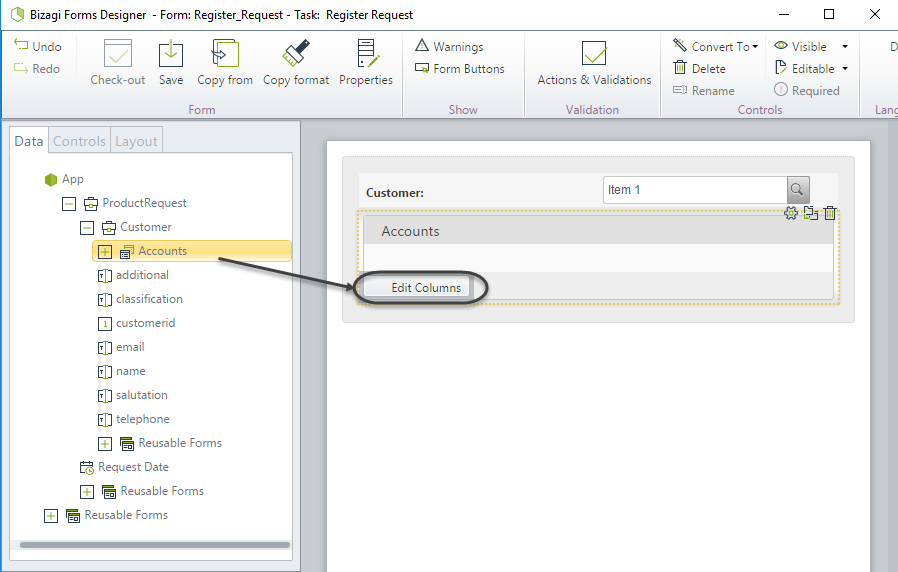
We include the Customer_Account attributes: Account Number, Creation Date and Balance.
Save this form.
Back in our main form, make sure the Accounts table is set as read-only.
This means, ensuring that the table control is not set to allow adding, editing or deleting records.
At this point, we have finished setting Virtualization for related entities.
Our external CRM database tables will be used transparently in our Product Request Process!
Execution
Proceed to run your Process:
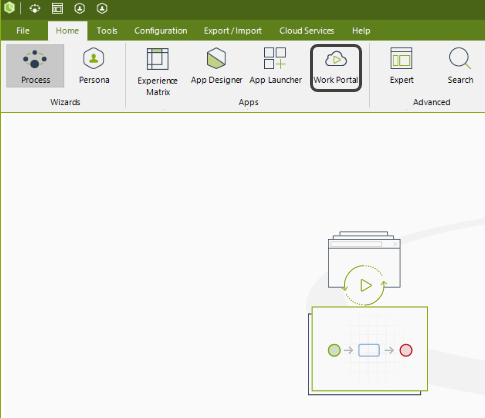
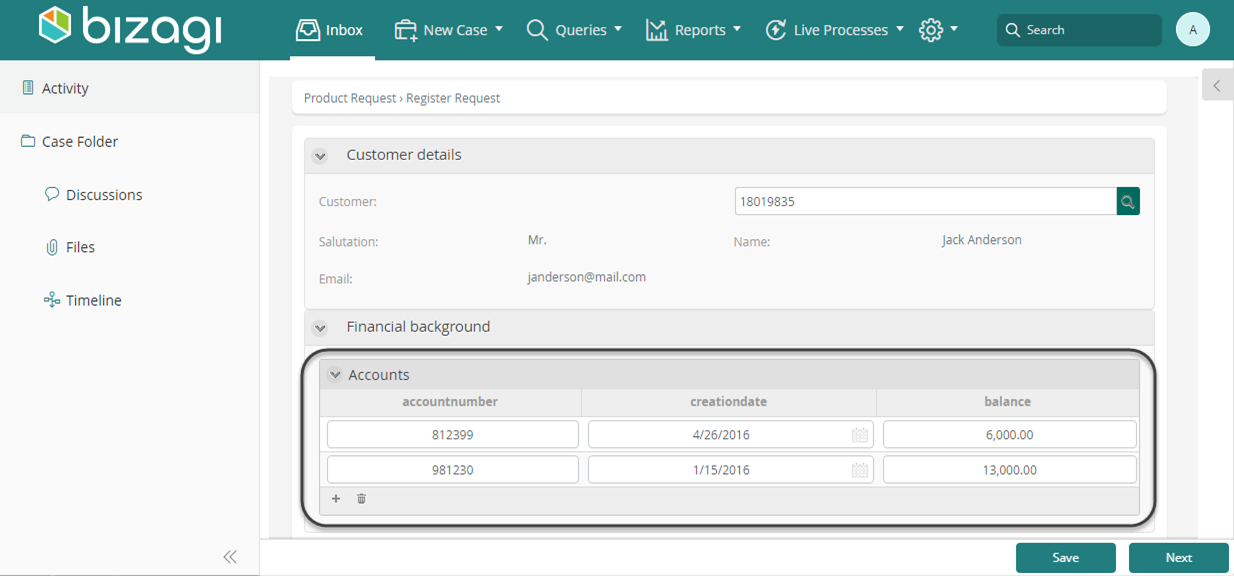
In the Work Portal you may create a new Product Request case and in its first Activity (Register Request) search for an existing customer:

Its associated accounts will be automatically shown in the table below:
Additional Considerations
When using Virtualization for related Entities, there are more sophisticated scenarios which are supported by Bizagi.
For example: having compound primary keys at the source, having Parameter Entities replicated related to virtual Master Entities, etc.
Compound primary keys
Bizagi supports Virtualization for Entities which have compound primary keys in the existing repository (more than one column making up the primary key in the external data source).
To configure this type of scenarios, in Bizagi we have only to make sure that all the mapped attributes that correspond to the primary key, are included as business key for the virtual entity definition.
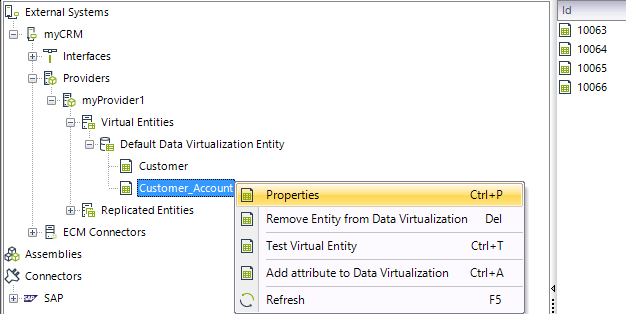
To review or modify (include) the definition of which attributes in the virtual entity are mapped to the source's primary key, you may right-click the virtual entity and select its properties (in the Systems module).
In our previous Customer_Account example, only the "accountnumber" attribute was set as the business key for the Customer_Account entity (there is no compound primary key).
You may edit or review this setting by locating the specific Entity at the Systems module, and right-clicking to its Properties:
To include more than one attribute as the primary key, choose the extra attributes making up the businessKey definition.
|
By default, Bizagi will read the primary key definition from the source (when using the Virtualization Wizard) and include any attributes making up a compound primary key. |
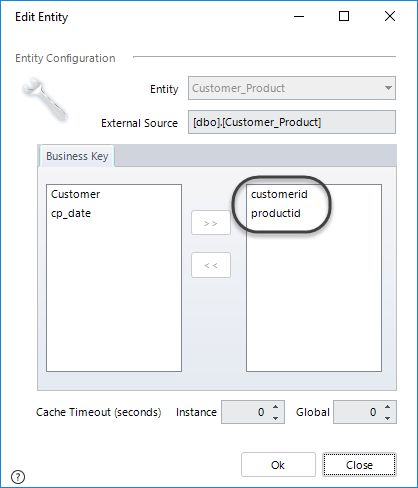
Using as an example an Customer_Products table in an external data source, we could have its primary key be defined by both ProductId and CustomerId attributes:
This means that in Bizagi, we would need to make sure that for this entity, the businessKey includes both attributes:
Last Updated 2/1/2023 9:58:36 AM