The different features of the E-mail setup will allow you to easily include business information used in Processes and stored in the data model.
Data model information and some special information will be included in the body of the e-mail between angle brackets "< >" as variables that change their value from case to case.
When the E-mail reaches the addressees this tagged information will be interpreted, resolved and the real values displayed.
Include information stored in the data model
You can include all your business process data in the E-mail messages, if the data has been saved in the data model's attributes.
To include any attribute it is necessary to enter its XPath from one of two available options: navigating the data model or using the XPath field option.
•Build the XPath by navigating the data model:
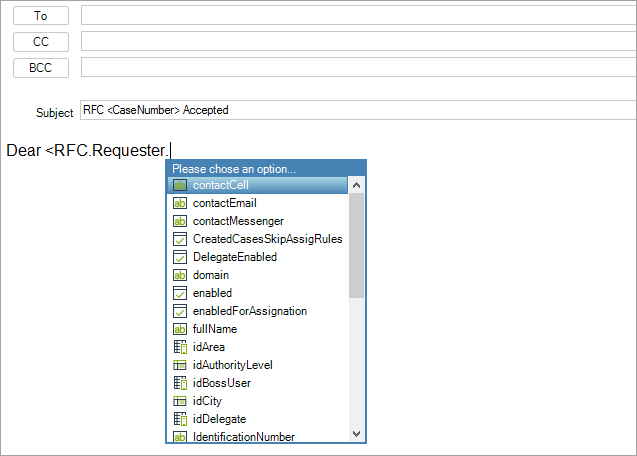
To include values of attributes, indicate the path to reach the attribute between angle brackets: '<' and '>'. As soon as '<' is typed, a drop-down list will appear with all the attributes of the Process Entity and the attribute Case, which relates to Runtime entities. Type the open bracket '<' and select the first attribute. Then, type a period (.) to continue navigating until the attribute is reached. You will be able to move from one entity to another using the foreign key to obtain the attributes in another entity. Once you have selected the attribute, remember to add the enclosing tag by typing the close bracket (>).
•Select the attribute through the XPath Field option
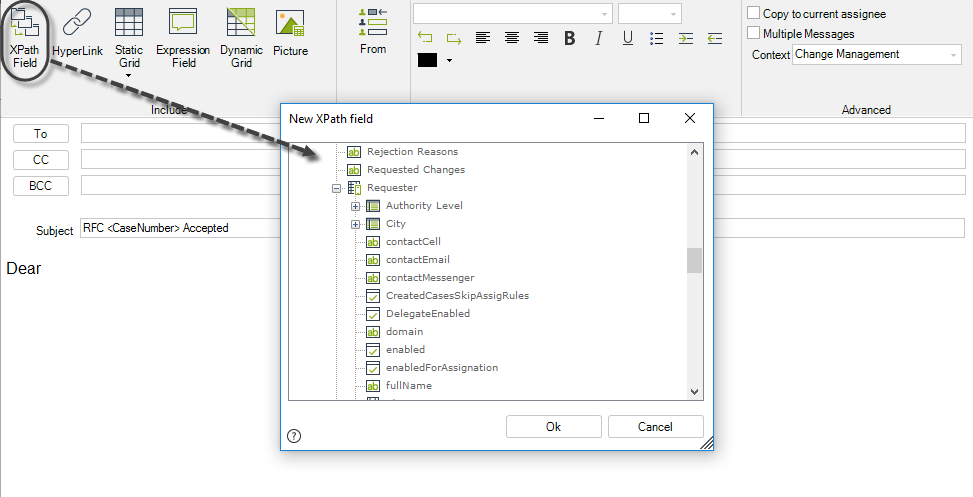
Click the XPath Field toolbar button and navigate the data model until you reach the desired attribute. Double-click to select and include the attribute in the body of the E-mail.
Format date function
When you need a date in a different format from the one designated in the project, you can use the format date function (<format-date(<Xpath>,"format")>) to define the desired format.
This function can be used within both the subject or the body of the message but not inside dynamic grids.
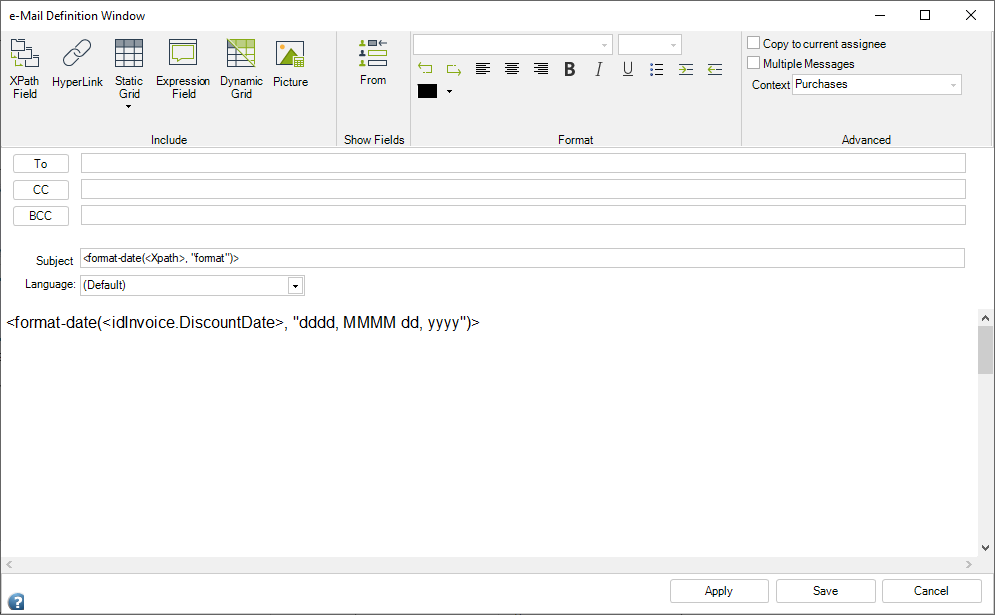
The format date function has two parameters:
•<Xpath>: corresponds to the Xpath of the date type attribute.
•Format: is the desired date format to display the attribute. The available formats are the following:
Date |
Result |
|
Time |
Result |
|---|---|---|---|---|
dddd, MMMM dd, yyyy |
Wednesday, August 03, 2022 |
|
HH:mm |
14:25 |
M/yy |
8/22 |
|
hh:mm tt |
2:25 PM |
d-MMM |
3-Aug |
|
HH:mm:ss |
14:25:47 |
dd-MMM-yy |
03-Aug-22 |
|
hh:mm:ss tt |
2:25:47 PM |
MM-dd-yy |
08-03-22 |
|
|
|
Include special information
You can include special information in e-mails without any rules or coding:
•<CaseNumber>: includes the Case Number of the case that is sending the e-mail.
•<TodayDate>: includes today's date.
•<CaseLink>: inserts a link to the case that is sending the E-mail. The link will open the case in Bizagi's Work Portal. This option can only be used on the body of the email.
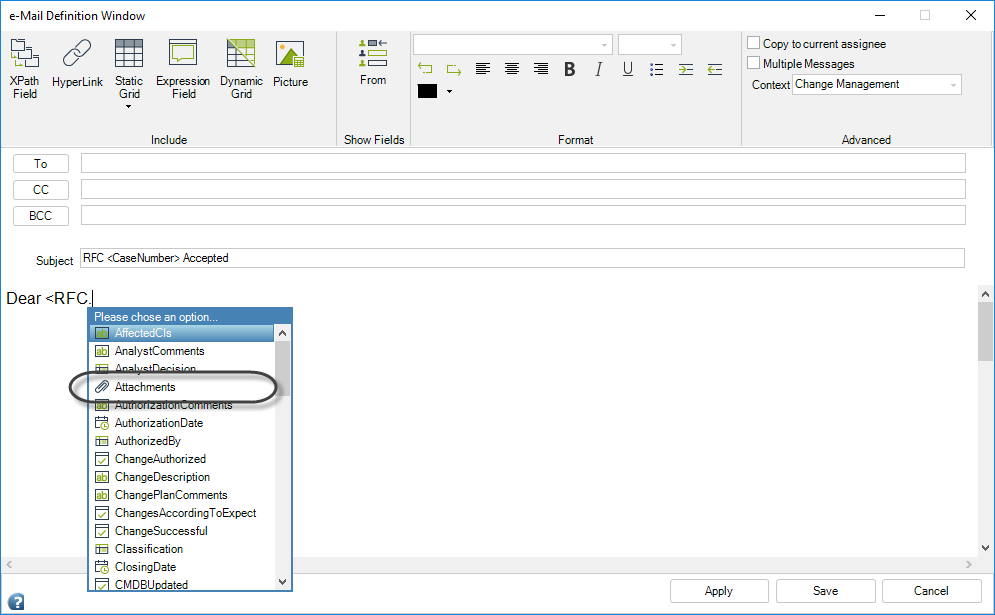
•<Case>. displays all the information available from Runtime entities which contain read-only information relating Bizagi’s process and cases internal data.
In order to include this kind of information, type the open angle bracket "<". A drop-down menu will be displayed, select the information you wish to include by double-clicking on it.

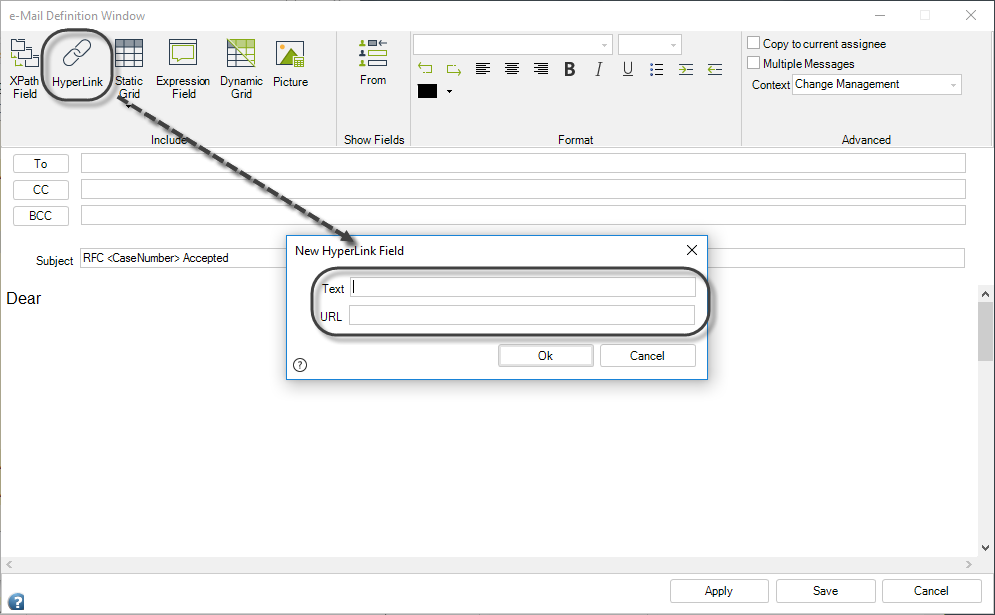
To add a hyperlink, select HyperLink at the top of the window. Enter a display name in the Text field and the web address in the URL field. Ensure that the URL begins with https://, as this indicates a secure, encrypted connection that protects user information and prevents potential security risks.
When the recipient receives the email, the display name will appear as a clickable hyperlink. However, if the URL does not include https://, the hyperlink may not display correctly in Outlook, preventing recipients from accessing the link.
Include uploaded Files and Document Templates
To send uploaded files or Document Templates in the e-mail, enter the XPath of the attribute containing the file (or Letter). Select the attribute, as before, using angle brackets: <FileToUpload>. An alternative way to obtain the attribute directly is using the XPath Field button.
You can include the XPath anywhere in the e-mail body, and it will not be displayed in the received message, as the uploaded file or Document template will be sent as an attachment.
If you have a collection with a file type attribute, you can also attach all the files included in the collection. For example, <Entity.Collection.FileAttribute>
Example to Include information in a E-mail
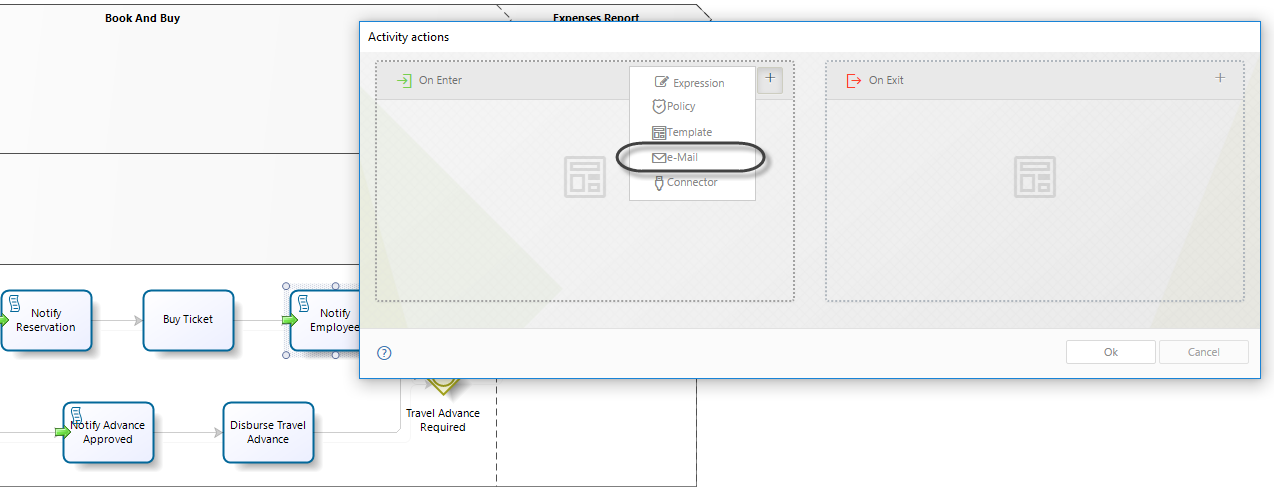
A Travel Request Process handles the necessary Activities to deal with travel requests made by the employees of a company. The Administrative Department is in charged of booking the hotel, flights and a car. Several notifications are sent to the employee during the course of the Process to inform the bookings status.
When the flight tickets has been booked, an E-mail is sent to the applicant with all the booking information including airline information and the flight details in the E-ticket attachment. Follow the next steps to create this E-mail:
1. Go to the Activity Actions option in the fourth step of the Process Wizard. Select the Activity where the E-mail must be sent and define an On Enter or On Exit Action. Click Add an select the E-mail option.
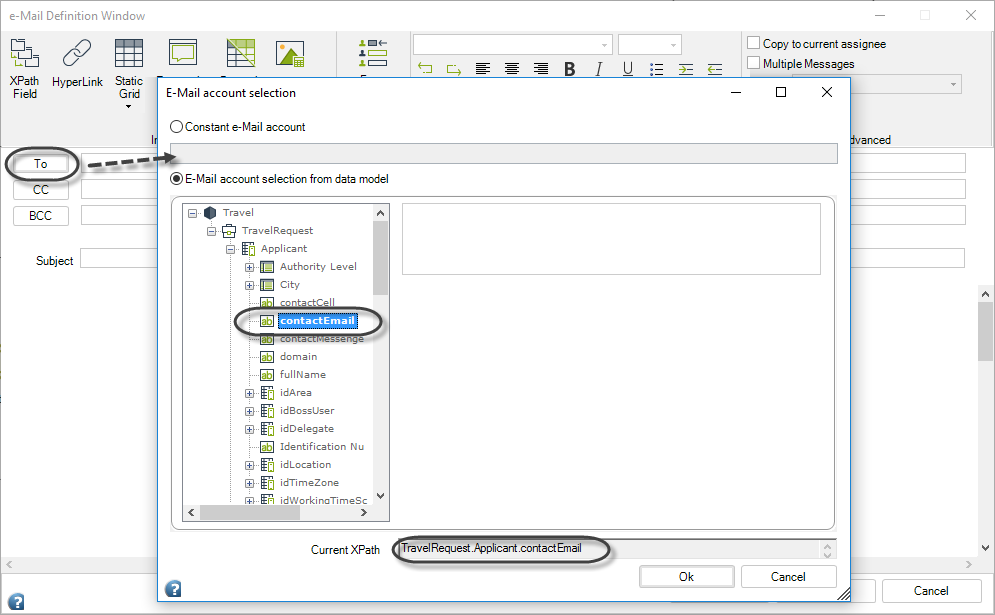
2. Select the addressees.
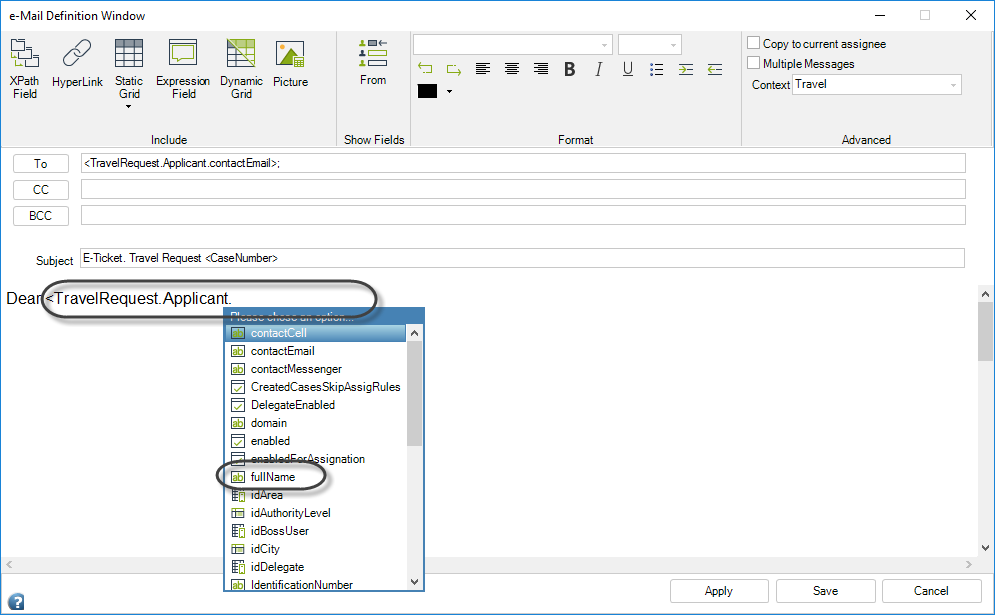
Click To and include the E-mail address. In the new window, navigate in the entity-relationship model to the attribute where the e-mail address has been saved. In this example we select the Applicant´s E-mail address.
3. Type a Subject and the body for the message.
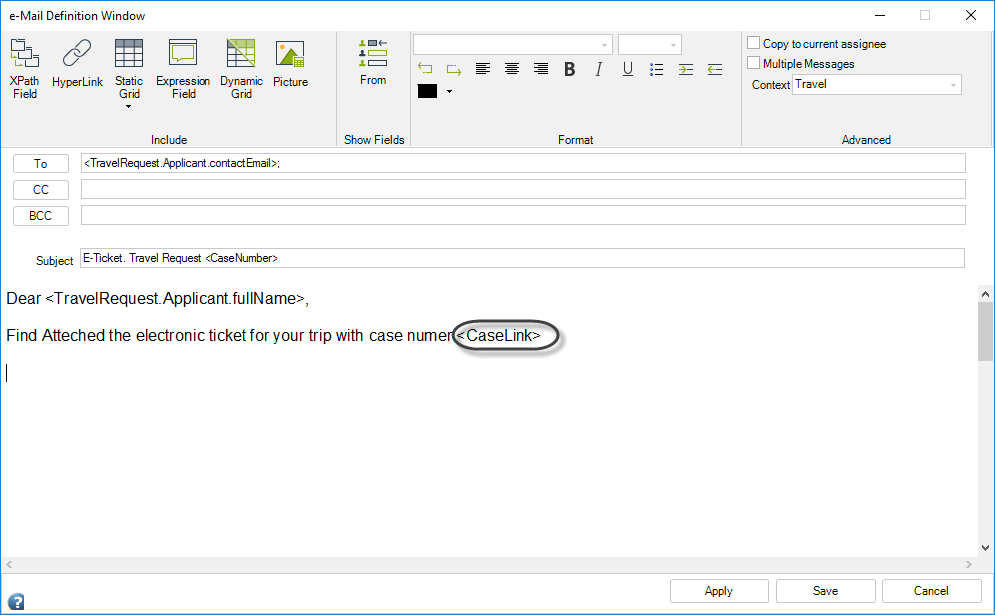
Use the <Case Number> email property to include the Case identifier in the Subject.
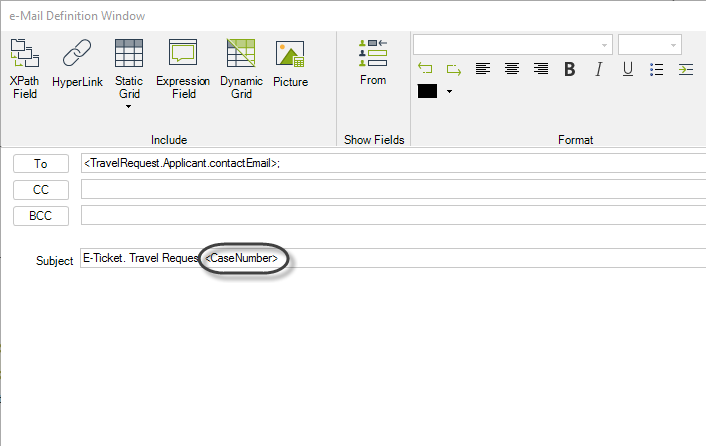
Use the angle brackets "<>" method to include information stored in the data model. For example the Applicant's name.
Use the <Case Link> email property to include a link to the Case in the body of the message.
|
When using an iPad device, bear in mind the following consideration for Case Links. |
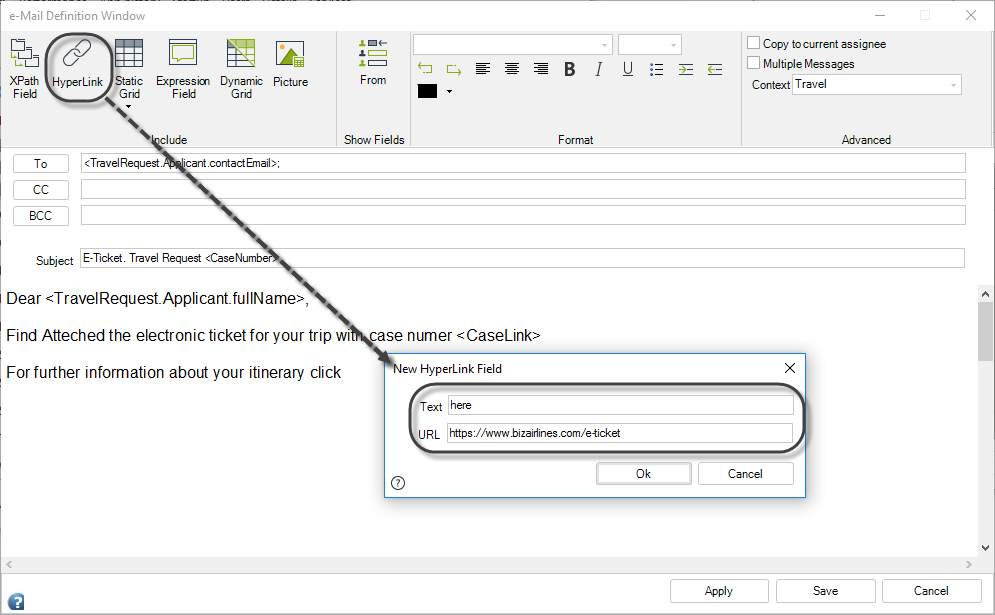
Provide airline information by inserting a Hyperlink to the airline website. Place the cursor in the place where the hyperlink should be displayed and click the Hyperlink button. Type the hyperlink text and the associated URL.
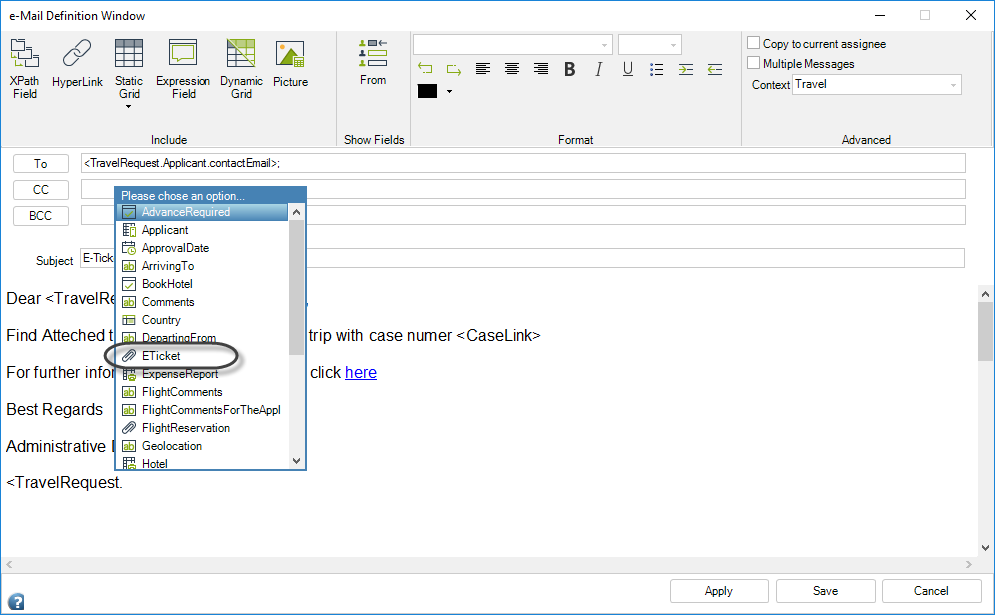
Send the E-ticket as an attachment in the E-mail. Select the file type attribute where the E-ticket is stored using the angle brackets method.
4. Click Save.
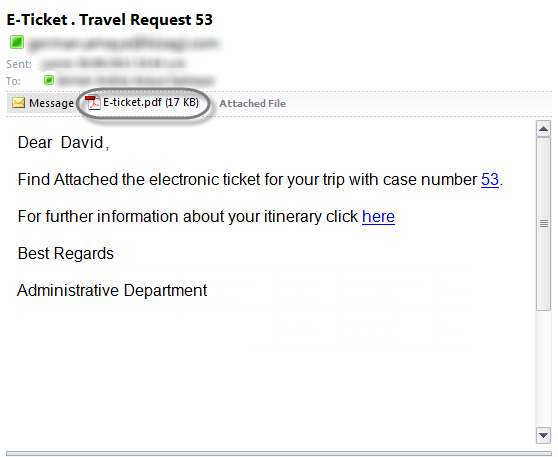
This is how the E-mail received will look:
Last Updated 2/14/2025 10:35:35 AM